RustGPT: My Journey Using Rust + HMTX for Web Dev
You can find the entire code on GitHub.
You can also try out the app, I host a demo version here: rustgpt.bitswired.com.
I have more than 10 years of experience with web technologies, but I’m a Rust newbie currently learning the language. Working in the Data/AI engineering domain, I extensively use Python (handling data and models) and TypeScript/JavaScript (to build apps integrated with AI models).
While my exposure to languages like C, C++, Haskell, Java, and Scala was primarily academic or as a hobby, I found myself drawn to Rust. And to learn Rust better, what better than to embark on a project?
It’s been some time since I wanted to try HTMX, too, so it’s the perfect occasion to dive in Rusty waters while catching the HTMX wave: let’s build a ChatGPT clone with Rust, HTMX, and my favorite styling framework, TailwindCSS.
It’s already at least my 4th ChatGPT clone with different technologies, as it’s a great Hello World project to evaluate a tech stack for the Web.
Indeed, ChatGPT involves:
- Authentication: users should be able to signup, login, and have personal data
- Database: storing user data
- Streaming: implementing server-sent events (SSE) to achieve text streaming.
Let’s dive into it.
Stack Choices
OK, the whole stack will be:
- Axum for the web server
- Tera for templating
- SQLite and SQLx for the database
- HTMX for interactivity
- TailwindCSS for the style
- Justfile to organize useful commands.
Choosing the backend framework (Axum)
After reviewing web frameworks in Rust, particularly Actix and Axum, I leaned towards Axum. While I lacked prior experience, Axum's approach resonated with me. It offered intuitive ways to navigate code samples and important functionality implementation like:
- Routing
- Sharing state (like database pool, …)
- Middleware (e.g. authentication)
- Serialization/Deserialization
- Extracting parameters in route handlers (like path parameters, query strings, …)
- Streaming response (SSE)
- Error handling
Choosing the templating framework (Tera)
There are mainly two libraries for templating that are often mentioned in the Rust ecosystem:
- Askama
- Tera
In brief, Askama templates are statically compiled, meaning that the compiler will catch errors like forgetting to pass a required variable to a template. It is also faster thanks to the compiling part.
Tera templates are not statically analyzed, so you can have runtime errors, however, they are more flexible especially because they support features closer to Jinja: you can define macros that takes parameters like functions and reuse them like a components in other templates. For instance here is a re-usable “HTML component” to display a message in the chat interface that I can re-use in other Tera templates:
{% macro message(variant, text) %}
<div data-variant="{{ variant }}" class="p-4 px-16
    data-[variant=ai]:bg-slate-100
    data-[variant=ai-sse]:bg-slate-100
    data-[variant=human]:bg-slate-200
    ">

    <div class="max-w-[600px] m-auto prose">
        {% if variant == "ai-sse" %}
        <div id="message-container">
            <!-- Messages will be appended here -->
        </div>
        <div id="sse-listener" hx-ext="sse" sse-connect="/chat/{{ chat_id }}/generate" sse-swap="message"
            hx-target="#message-container"></div>
        {% else %}
        {{text | safe}}
        {% endif %}

    </div>

</div>
{% endmacro input %}
As you can see it takes as parameter a variant and a text and renders it accordingly.
Then I use it as follows in the chat.html template:
{% import "components/message.html" as macros %}

...

<div class="flex flex-col h-full w-full overflow-y-auto">
    {% if chat_message_pairs %}
    {% for pair in chat_message_pairs %}

    {{ macros::message(variant="human", text=pair.human_message_html) }}

    {% if pair.pair.ai_message %}
    {{ macros::message(variant="ai", text=pair.ai_message_html) }}
    {% else %}
    {{ macros::message(variant="ai-sse", text="") }}
    {% endif %}

    {% endfor %}
    {% endif %}

    <div id="new-message"></div>

    <div class="mt-[200px]"></div>
</div>

...
It’s as simple as macros::message(variant="ai", text=pair.ai_message_html) to use the component.
No need for a JS framework to add re-usable components to your app 😉.
Choosing a style framework (TailwindCSS)
Here I don’t have a lot to say, my mind way already made. I love TailwindCSS mainly because I don’t need to handle a bunch of additional CSS files (everything is inside my HTML) and I don’t have to come up with names (it’s a pain to name classes in CSS for re-usability and semantics, Tailwind solves that beautifully).
One thing I discovered though is Standalone Tailwind which is a standalone executable: you can run TailwindCSS without needing to install NodeJS and NPM. That’s cool because I want to avoid mixing my shiny Rust stack with JavaScript tools as I won’t write a single line of JS in this project.
Choosing the database and “To ORM or not to ORM?”
I chose SQLite almost every time for new projects:
- It’s super convenient: the database lives in one file. Need to debug prod? simply copy the file on your local machine and debug. Need to test? simply create the database in memory?
- It’s fast: the db lives in the same process as your code, it’s as close as you can get
- It scales pretty well even with concurrent writers using the WAL mode
- Also it’s SQL meaning strong data integrity and transactions
To handle the database operations I used a Rust library called SQLx. It handles migrations, database creation and more importantly: query verification at compilation time! Wow I love that feature. You can see in the code editor if your queries are valid, and the code won’t compile if you mess something up.
This work thanks to procedural macros in Rust that allows the library to connect to the database to check your request at compile time. And I can tell you that it prevents tons of error!
Also I love the fact that it gives you raw access to the database, and it’s not an ORM. I won’t go into the debate here but I tend to prefer not using an ORM. Raw SQL + Serialization with Serde into Rust structs will get you far and you control entirely the queries. ORMs can be a pain when working with joins, or they can produce weird queries sometimes that are sub-optimal (I’m looking at you Prisma, making additional queries for relationships instead of joining issue link)
Adding interactivity (HTMX)
Here no specific argument for this choice except that I wanted to give HTMX a serious try for a while. What seduces me the most about this tech is that I can pick my favorite language to build an interactive web application without the need to leave the backend realm. So I don’t need to duplicate state management in the backend and frontend like you usually do with frameworks like React (for instance using tools like React Query to keep the server and the client states synchronized). I don’t need to share interfaces between two environments for the data transfers. And I don’t need to ship a huge JavaScript bundle to the client (HTMX is only 1.3kB minified + gzipped).
Organizing the commands (Just)
I discovered Just recently as a convenient commands and tasks runner.
- init: Installs necessary dependencies (
cargo-watchandsqlx-cli). - dev-server: Watches for changes in specific directories/files and restarts the server accordingly.
- dev-tailwind: Watches for changes in the
input.cssfile and compiles TailwindCSS accordingly. - build-server: Builds the server in release mode.
- build-tailwind: Minifies TailwindCSS.
- db-migrate: Executes database migrations using SQLx.
- db-reset: Resets the database, dropping and recreating it while also running migrations and seeding data.
- dev: Concurrently runs the
dev-tailwindanddev-servertasks, managing their processes and handling termination.
This setup optimizes the development workflow, automating various tasks like server reloads, CSS compilation, and database operations.
Rust 💚
First of all I enjoy coding in Rust and building a web application was a fun experience.
I’m getting used to the Rust compiler and the mental shift necessary to code in Rust: borrowing, procedural macros, mut vs non mut references, traits …
I won’t lie, it takes some diligence and sometimes it can be tough to make a chunk of code compile, but overall it’s fine especially if you already have experience with other compiled languages.
I noticed that in Rust I spend more time in my code editor making the code work, but when it compiles it usually work as intended and is free of runtime issues. Whereas in Python and TypeScript I write super fast but spend more time debugging runtime issues.
And I can tell you that I definitely prefer making the code to compile instead of runtime debug 😅.
Also something I love in Rust is the error handling, with the Result type: how cool is it to have function potentially failing to return Result ?
It forces you to deal with the result either handling with the error or unwrapping which can panic leading to runtime issues but at least you do it deliberately. Combine that with the ? operator and it feels awesome.
Also the Trait system and the lack of inheritance are features that I particularly love.
I will give you one example of a struggle for me as a Rust newbie:
pub async fn chat_generate(
    Extension(current_user): Extension<Option<User>>,
    Path(chat_id): Path<i64>,
    State(state): State<Arc<AppState>>,
) -> Result<Sse<impl tokio_stream::Stream<Item = Result<Event, axum::Error>>>, ChatError> {
    let chat_message_pairs = state.chat_repo.retrieve_chat(chat_id).await.unwrap();
    let key = current_user
        .unwrap()
        .openai_api_key
        .unwrap_or(String::new());

    match list_engines(&key).await {
        Ok(_res) => {}
        Err(_) => {
            return Err(ChatError::InvalidAPIKey);
        }
    };

    let lat_message_id = chat_message_pairs.last().unwrap().id;

    // Create a channel for sending SSE events
    let (sender, receiver) = mpsc::channel::<Result<GenerationEvent, axum::Error>>(10);

    // Spawn a task that generates SSE events and sends them into the channel
    tokio::spawn(async move {
        // Call your existing function to start generating events
        if let Err(e) = generate_sse_stream(
            &key,
            &chat_message_pairs[0].model.clone(),
            chat_message_pairs,
            sender,
        )
        .await
        {
            eprintln!("Error generating SSE stream: {:?}", e);
        }
    });

    // Convert the receiver into a Stream that can be used by Sse
    // let event_stream = ReceiverStream::new(receiver);
    let state_clone = Arc::clone(&state);

    let receiver_stream = ReceiverStream::new(receiver);
    let initial_state = (receiver_stream, String::new()); // Initial state with an empty accumulator
    let event_stream = stream::unfold(initial_state, move |(mut rc, mut accumulated)| {
        let state_clone = Arc::clone(&state_clone); // Clone the Arc here
        async move {
            match rc.next().await {
                Some(Ok(event)) => {
                    // Process the event
                    match event {
                        GenerationEvent::Text(text) => {
                            accumulated.push_str(&text);
                            // Return the accumulated data as part of the SSE event
                            let html =
                                comrak::markdown_to_html(&accumulated, &comrak::Options::default());
                            let s = format!(r##"<div>{}<div>"##, html);

                            Some((Ok(Event::default().data(s)), (rc, accumulated)))
                        }
                        GenerationEvent::End(text) => {
                            println!("accumulated: {:?}", accumulated);

                            state_clone
                                .chat_repo
                                .add_ai_message_to_pair(lat_message_id, &accumulated)
                                .await
                                .unwrap();

                            let html =
                                comrak::markdown_to_html(&accumulated, &comrak::Options::default());

                            let s = format!(
                                r##"<div hx-swap-oob="outerHTML:#message-container">{}</div>"##,
                                html
                            );
                            // append s to text
                            let ss = format!("{}\n{}", text, s);
                            println!("ss: {}", ss);

                            // accumulated.push_str(&ss);
                            // Handle the end of a sequence, possibly resetting the accumulator if needed
                            Some((Ok(Event::default().data(ss)), (rc, String::new())))
                        } // ... handle other event types if necessary ...
                    }
                }
                Some(Err(e)) => {
                    // Handle error without altering the accumulator
                    Some((Err(axum::Error::new(e)), (rc, accumulated)))
                }
                None => None, // When the receiver stream ends, finish the stream
            }
        }
    });

    Ok(Sse::new(event_stream))
}
Here the idea was to accumulate and process the stream created by the function generate_sse_stream . It’s making a call to OpenAI API in streaming mode and return a stream of text generation. Now in my route handler I want to process this stream to parse it as markdown to HTML and accumulate it so I can save the whole message in the database when the generation is done.
I had some difficulties to to it, as I need to map a stream while accumulating a value and do so while using async functions (for the database call).
But that’s not all, since I also need to send each chunk as I process them. So to summarize here is what happens for each chunk coming from the OpenAI stream:
- Accumulate the chunk in a variable
- Transform in HTML with a markdown processor
- Check if the stream is done, and if so make a call to the database
- Send the current accumulated markdown to the user via SSE
- Repeat …
In the end I managed to make it work. However I can’t tell you I did it the best way possible since I’m a Rust newbie.
My challenge was initially identifying the need for the 'unfold' function, enabling asynchronous processing of a stream while accumulating values and yielding new items in real-time, not processing the entire stream at once. Subsequently, I had to manage the moves right to make the borrow checker happy, resulting in the following implementation:
...
	let event_stream = stream::unfold(initial_state, move |(mut rc, mut accumulated)| {
	    let state_clone = Arc::clone(&state_clone); // Clone the Arc here
	    async move {
	        match rc.next().await {
  ...
HTMX 💚
I used HTMX plus the SSE extension to handle streams of data.
Let’s discuss how I implemented the different interactivity features in the app, maybe it will give you some ideas.
Realtime Streaming with SSE

The SSE extension call the endpoint that we discussed in the previous Rust section:
{% macro message(variant, text) %}
<div data-variant="{{ variant }}" class="p-4 px-16
    data-[variant=ai]:bg-slate-100
    data-[variant=ai-sse]:bg-slate-100
    data-[variant=human]:bg-slate-200
    ">

    <div class="max-w-[600px] m-auto prose">
        {% if variant == "ai-sse" %}
        <div id="message-container">
            <!-- Messages will be appended here -->
        </div>
        <div id="sse-listener" hx-ext="sse" sse-connect="/chat/{{ chat_id }}/generate" sse-swap="message"
            hx-target="#message-container"></div>
        {% else %}
        {{text | safe}}
        {% endif %}

    </div>

</div>
{% endmacro input %}
I create first a message container to store the message:
<div id="message-container">
  <!-- Messages will be appended here -->
</div>
Then the following div connects directly to the SSE endpoint:
<div id="sse-listener" hx-ext="sse" sse-connect="/chat/{{ chat_id }}/generate" sse-swap="message"
    hx-target="#message-container"></div>
Doing so it will swap the html messages it receives into #message-container.
Finally, on the server side, when the stream is done, we replace the #sse-listener with an empty div. It’s a trick to stop the event source, other wise the browser keeps trying to reconnect triggering additional unwanted generation:
let s = format!(
    r##"<div hx-swap-oob="outerHTML:#message-container">{}</div>"##,
    html
);
Here we use and out-of-band update, meaning we replace an element in an arbitrary place on the website.
Delete Chats
Here it’s simple, we have an svg cross to delete chats, and. on click it triggers a delete call using hx-delete and swapping the response from the server to the element #chat-{chat-id}. The server answers with an empty div to clear the UI.
<a class="cursor-pointer hidden group-hover:flex text-pink-700 absolute inset-y-0 right-0 justify-center items-center"
    hx-delete="/chat/{{ chat.id }}" hx-target="#chat-{{ chat.id }}" hx-swap="outerHTML">
  <svg xmlns="http://www.w3.org/2000/svg" viewBox="0 0 24 24" fill="currentColor" class="w-6 h-6">
      <path fill-rule="evenodd"
          d="M12 2.25c-5.385 0-9.75 4.365-9.75 9.75s4.365 9.75 9.75 9.75 9.75-4.365 9.75-9.75S17.385 2.25 12 2.25zm-1.72 6.97a.75.75 0 10-1.06 1.06L10.94 12l-1.72 1.72a.75.75 0 101.06 1.06L12 13.06l1.72 1.72a.75.75 0 101.06-1.06L13.06 12l1.72-1.72a.75.75 0 10-1.06-1.06L12 10.94l-1.72-1.72z"
          clip-rule="evenodd" />
  </svg>
</a>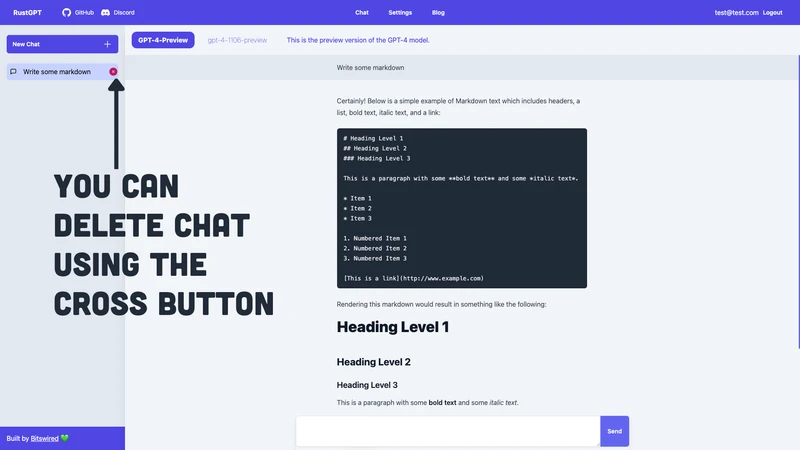
Create a new chat
This one is simple but interesting as it shows another great power HTMX give you: you can combine data from multiple input elements located in completely different forms and page location using the hx-include attribute.
<button type="submit"
      class="py-3 px-4 inline-flex flex-shrink-0 justify-center items-center gap-2 rounded-r-md border border-transparent font-semibold bg-indigo-500 text-white hover:bg-indigo-600 focus:z-10 focus:outline-none focus:ring-2 focus:ring-indigo-500 transition-all text-sm"
      hx-post="/chat" hx-include="[name='message'], [name='model']">
      Create
 </button>
In RustGPT when you create a new chat you need to specify a model and a first human message. However I have these information located in different area on the page, so I ask HTMX to gather the data when posting to the endpoint that creates the new chat with a query selector hx-include="[name='message'], [name='model']" .
That’s crazy how complex interactive features can be achieve declaratively with HTMX!
Append new messages to chat
Another example is how you keep chatting after the first message. As you can see here, when you post a new message after thee initial answer from the AI I will swap the element #new-message with the content that you posted:
<form class="max-w-[800px] mx-auto" method="post" hx-post="/chat/{{ chat_id }}/message/add"
  hx-target="#new-message" hx-swap="outerHTML">
  <div class="shadow-lg pb-2 backdrop-blur-lg">
      <label for="hs-trailing-button-add-on" class="sr-only">Label</label>
      <div class="flex rounded-md shadow-sm">
          <textarea name="message" type="text" id="hs-trailing-button-add-on"
              name="hs-trailing-button-add-on"
              class="p-4 block w-full border-gray-200 shadow-sm rounded-l-md text-sm focus:z-10 focus:border-indigo-500 focus:ring-indigo-500"></textarea>
          <button type="submit"
              class="py-3 px-4 inline-flex flex-shrink-0 justify-center items-center gap-2 rounded-r-md border border-transparent font-semibold bg-indigo-500 text-white hover:bg-indigo-600 focus:z-10 focus:outline-none focus:ring-2 focus:ring-indigo-500 transition-all text-sm">
              Send
          </button>
      </div>
  </div>
</form><div class="flex flex-col h-full w-full overflow-y-auto">
{% if chat_message_pairs %}
{% for pair in chat_message_pairs %}
{{ macros::message(variant="human", text=pair.human_message_html) }}
{% if pair.pair.ai_message %}
{{ macros::message(variant="ai", text=pair.ai_message_html) }}
{% else %}
{{ macros::message(variant="ai-sse", text="") }}
{% endif %}
{% endfor %}
{% endif %}
<div id="new-message"></div>
<div class="mt-[200px]"></div>
</div>Here you can see that after displaying all the messages, I add an empty placeholder <div id="new-message"></div> . It allows HTMX to always know where to append a new message.
Then the server answers with:
{% import "components/message.html" as macros %}

{{ macros::message(variant="human", text=human_message) }}
{{ macros::message(variant="ai-sse", text="") }}
<div id="new-message"></div>
Here we replace the div with the human message that you just posted, then an ai-see message that is that triggers the SSE generation as soon as it is rendered in the document.
And we don’t forget to append again a placeholder #new-message to handle the next message you will post.
So simple yet allowing complex interactivity. That’s why I love HTMX a lot.
Looking Ahead
Rust + HTMX is a dope combination allying the power of the Rust language with declarative interactivity.
I will definitely consider this combo for future projects, leveraging Axum for the web server that I found particularly powerful.
I plan to create a template repository or cookie cutter for the stack used in this repo: Rust + Axum + Tera + SQLx + Tailwind + Just.
I also want to give a serious try to the Leptos framework.
And of course keep learning and practicing Rust 💚.
I would love to hear from you about this stack, would you consider it for you future project? And for sure let me know on the repo if you have improvements or want to teach me a few Rust tricks.
Happy Rusty coding.